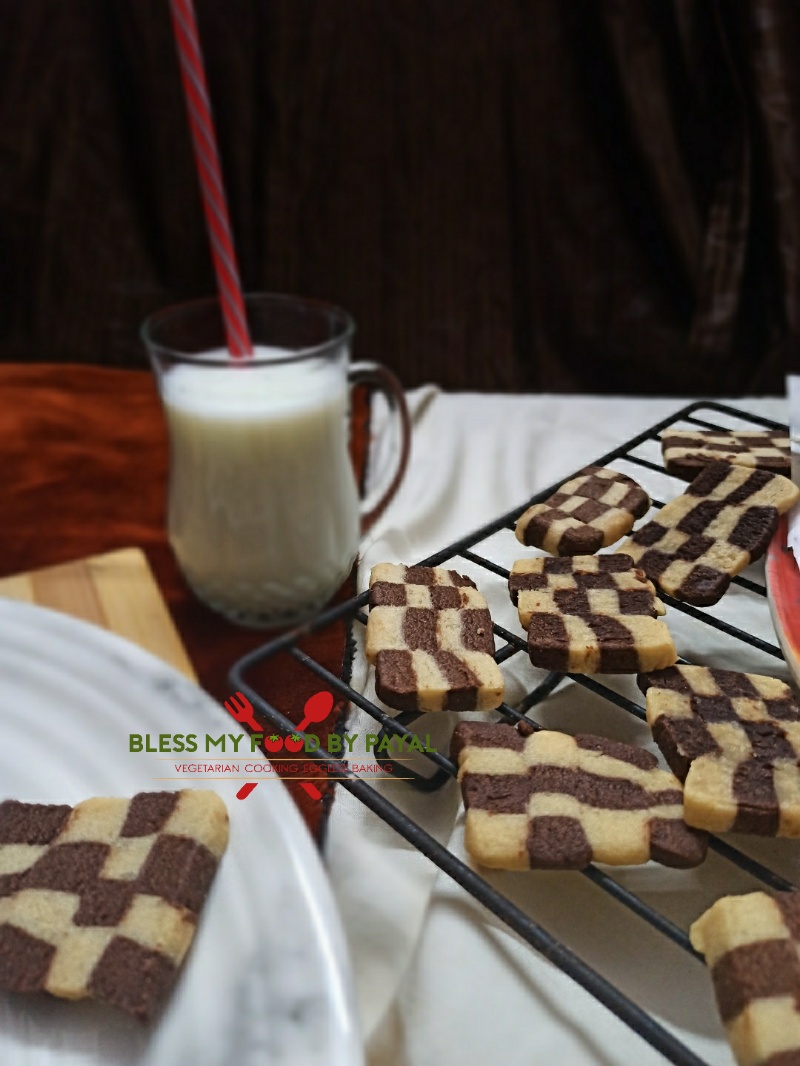
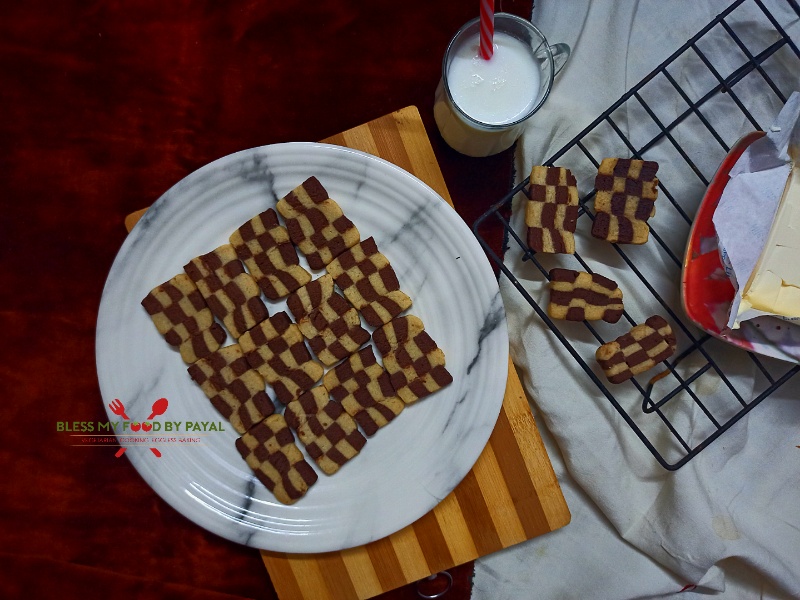
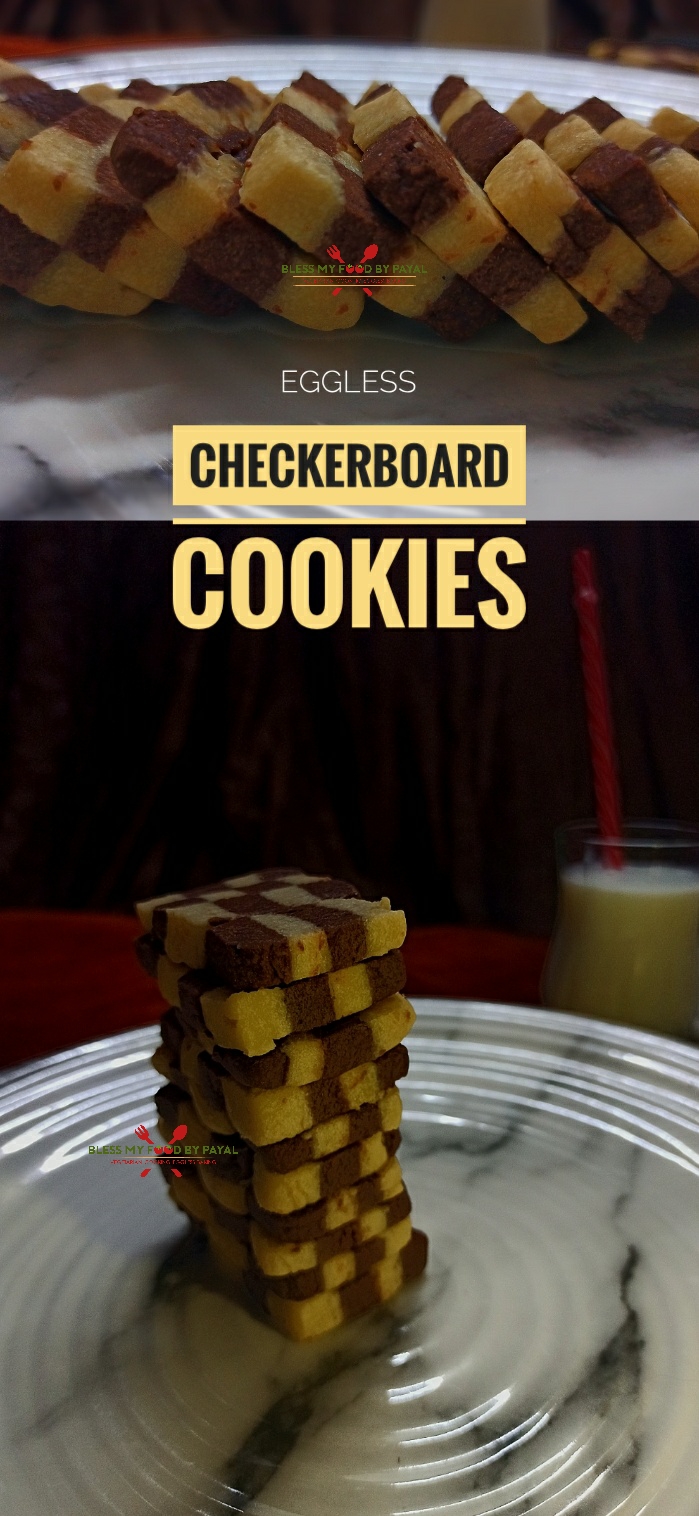
Eggless checkerboard cookies recipe | Chocolate Vanilla checkerboard Cookies recipe | Vanilla and chocolate cookies with step wise pictorial and video method.
WHY THESE COOKIES NAMED CHECKERBOARD ?
A checkerboard is a board of chequered pattern on which draughts is played. It consists of squares of alternating dark and light color.
Likewise, these cookies do look the same having small squares of dark and light color, so named as checkboard.
MAKING OF DOUGH
To give the checkerboard effect, we need the dough of 2 colors obviously and 1 out of 2 must be dark. So for the dark one, we made chocolate flavoured dough and for light one, vanilla dough.
It is to be noted that we made both the doughs separately so that there remains no issue in proportion because both dough should be of equal quantity.
We don’t have weighing machine and furthermore wanted to use separate essence for both doughs i.e. vanilla essence for vanilla and chocolate essence for chocolate dough. That is why we made both the dough’s separately.
If you are using one single essence i.e. vanilla and can divide the dough into 2 in exactly proper proportion, then you can make both dough’s in one go.
Here’s how…
Take the entire ingredients except cocoa powder and prepare one dough. Then divide the dough in 2 parts and mix cocoa powder very well in one part. Isn’t that easy?
STORAGE OF CHECKERBOARD COOKIES
Once they turn completely cool, put them in airtight container and they stay good for up to a week.
So let’s begin this recipe which though looks to be complex but actually it’s easy and making these cookies are indeed a fun.
Yes, it needs time just because thrice you need to refrigerate the cookies dough for about 30 minutes each term. But giving this much of time is not a big deal in lieu of beautifully baked eggless checkerboard cookies.
Also see..
- Karachi biscuits
- Oats cookies with ghee residue
- Custard cookies
- peanut butter cookies
- stained glass sugar cookies
Step wise pictorial recipe of Eggless checkerboard cookies recipe
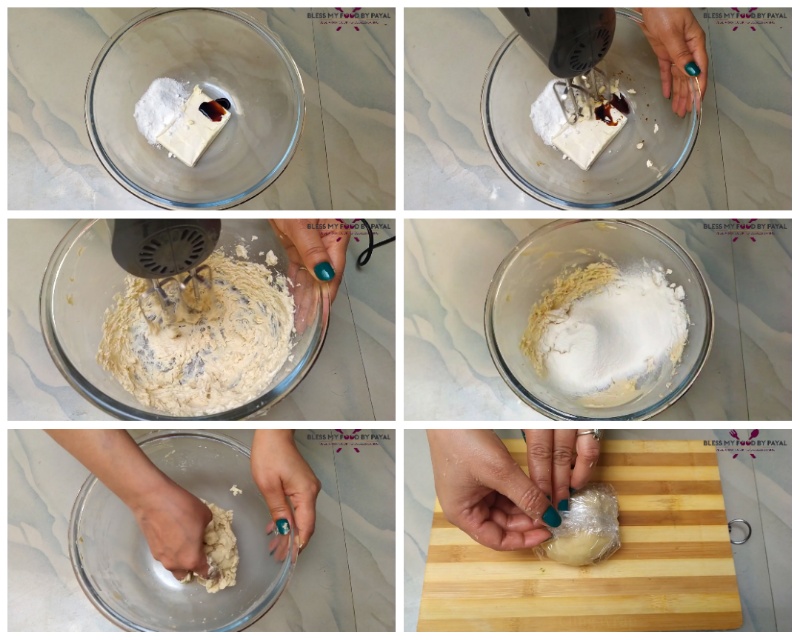
MAKING OF VANILLA DOUGH
- Take butter, powdered sugar and vanilla essence in a bowl. Butter should be chilled and not melted or warm.
- Whisk it with the electric beater. You can whisk it with hand wire whisk also but that requires lots of time and powder.
- In 2 to 3 minutes, butter will become light and fluffy.
- Sieve all purpose flour and salt in it.
- Mix it and you will find a crumbled texture.
- Now assemble the mixture using your hand. Don’t knead the dough but only bring it together. If mixture is troubling you in coming together, add a bit of cold milk. Though we didn’t need to add milk at all.
- Wrap the vanilla dough in a cling film.

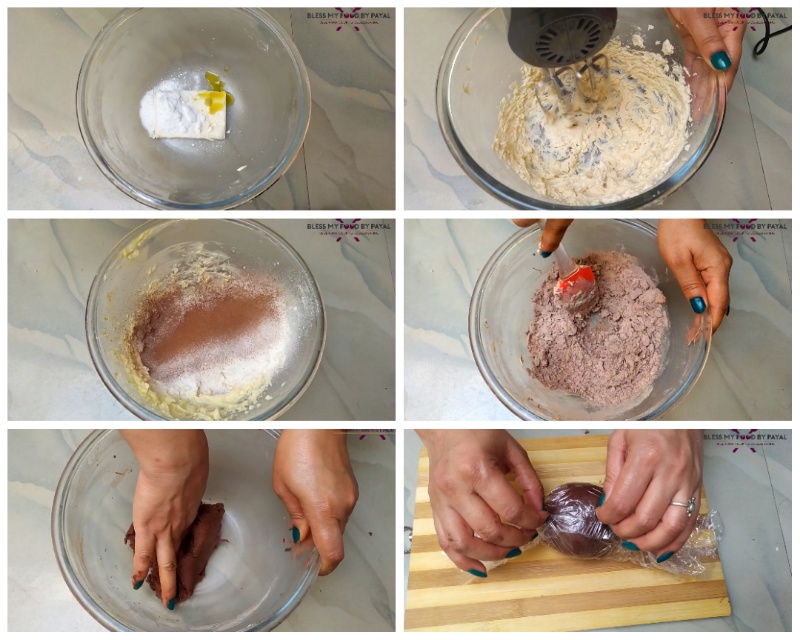
MAKING OF CHOCOLATE DOUGH
- The process of making chocolate dough is exactly similar to making of vanilla dough, except little changes in ingredients.
- Likewise whisk butter, sugar and essence together. We have added chocolate essence but if you don’t have it, use vanilla essence without hesitation.
- Sieve all purpose flour, salt and cocoa powder.
- Make a dough the way you made the vanilla flavoured above.
- Cling wrap this dough too.

FURTHER PROCESS
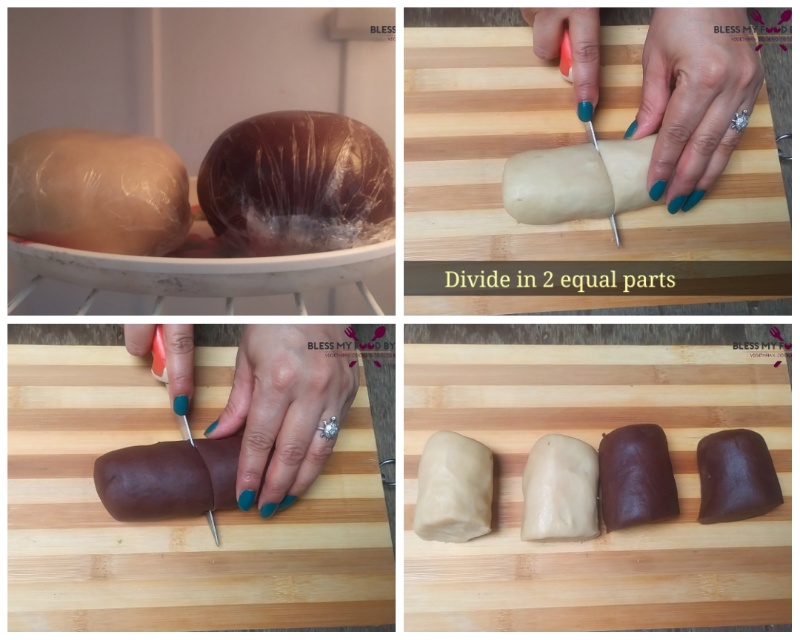
- Place both the doughs in refrigerator for about 30 minutes or till they become firm.
- After 30 minutes, unwrap both the doughs.
- Roll them into a log and cut from the centre dividing into equal parts.
- Now you have 4 portions of dough. 2 vanilla and 2 chocolate.
- Take any one dough (let it be chocolate), and roll it with the help of rolling pin. Don’t roll it too thin. We didn’t find any hardship in rolling them direct on the wooden surface. But if you find trouble, you can do all your work on cling wrap or butter paper.
- Cut the uneven sides of dough with knife leaving behind a rectangular slab which is almost 2 inches in width and 6 inches in length. Keep it aside.
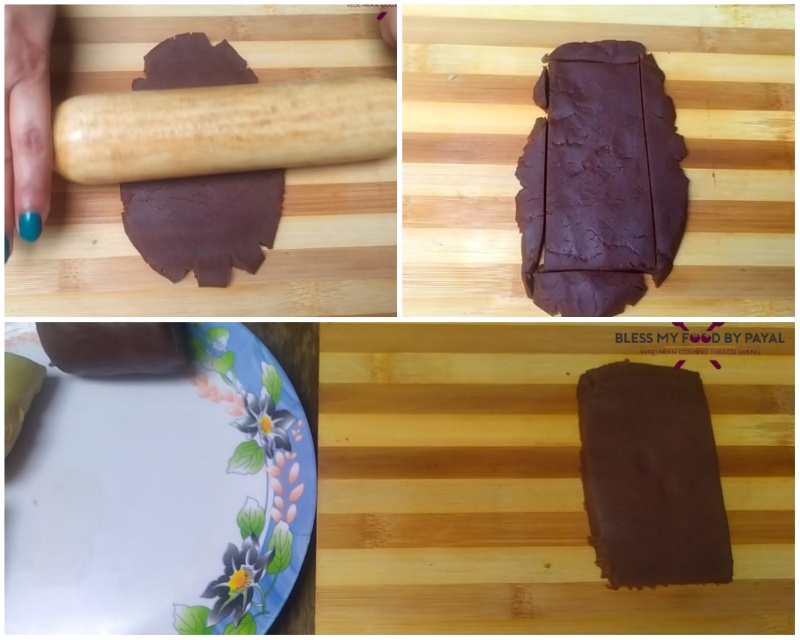
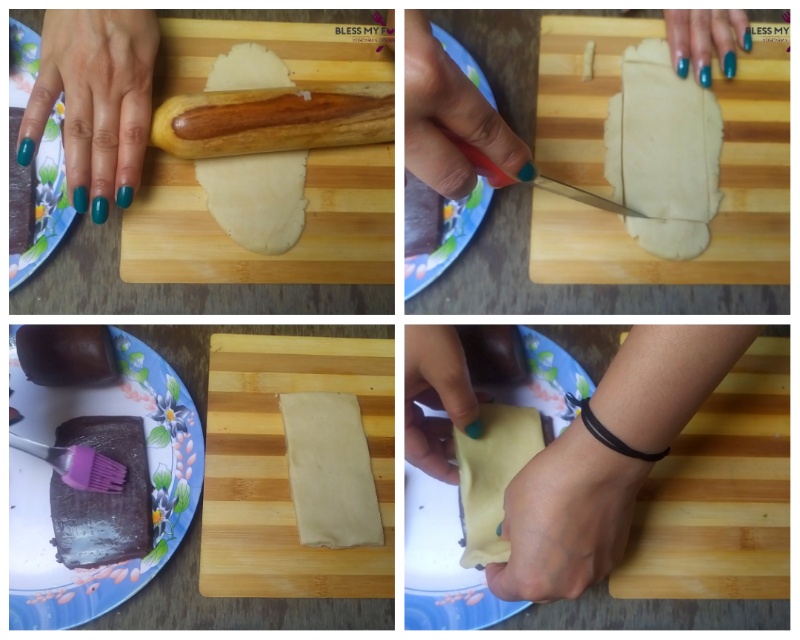
- Now take another dough but it should be of alternate colour. If earlier we took dark (chocolate) coloured, now we will take light (vanilla) one and roll it too like the previous one and cutting it’s odd sides.
- Brush milk on the earlier made slab (dark) and place the light slab on the dark one.
- Likewise make 4 layers of slabs in alternate colour one on another having milkwash in-between. Here we have chocolate > vanilla > chocolate > vanilla. To match perfectly, all slabs should be of equal size in length and width.
- Place them on a cling wrap and trim their uneven edges from all 4 sides.
- Put in refrigerator after wrapped in cling film for 30 minutes or until set.
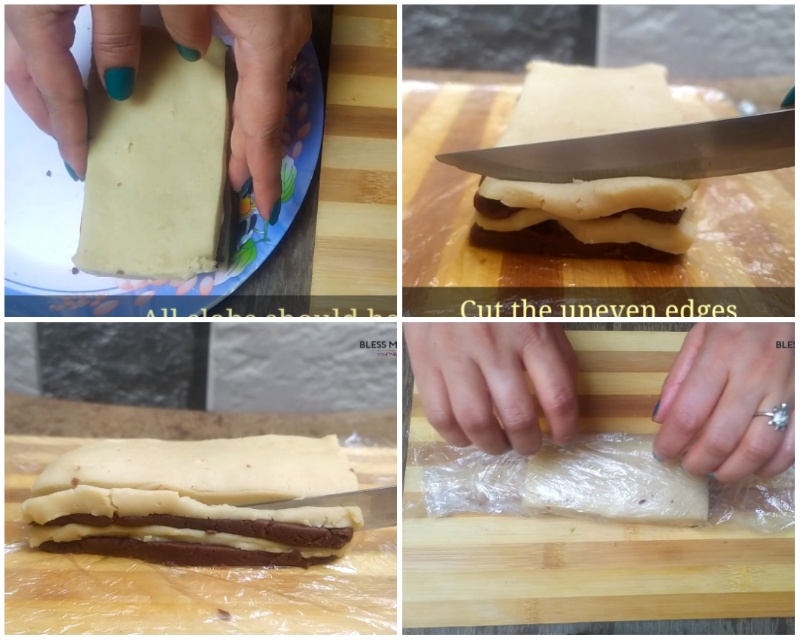
- Take them out and unwrap.
- Facing any side either dark or light towards you, make 3 small marks at equal distance so that you get it easily from where to cut them.
- Now cut and divide them from the marks straightwardly. On dividing by giving 3 cuts, you will get 4 strips.
- Right now they are standing tall showing only 1 colour, but if you laid them one sided, there are 4 layers of alternate colour in each strip.
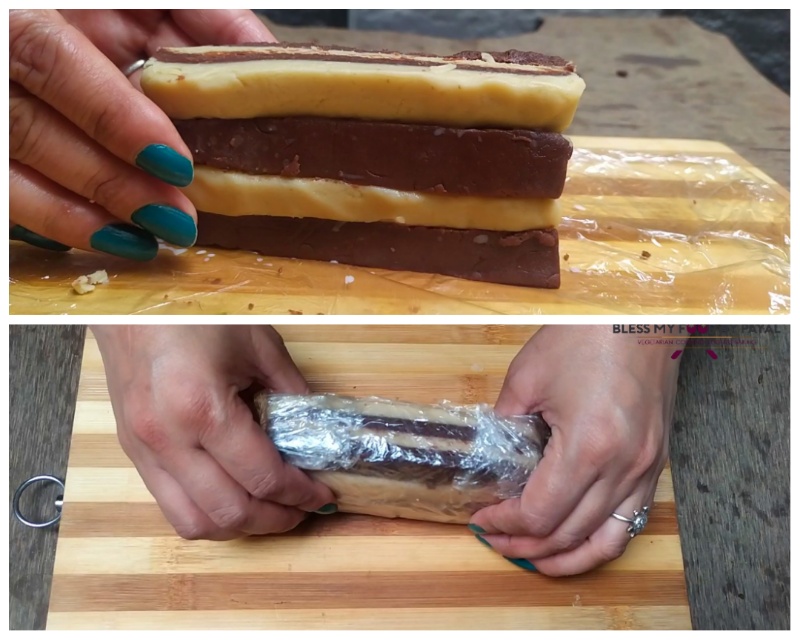
- Milkwash the alternate coloured side of one strip.
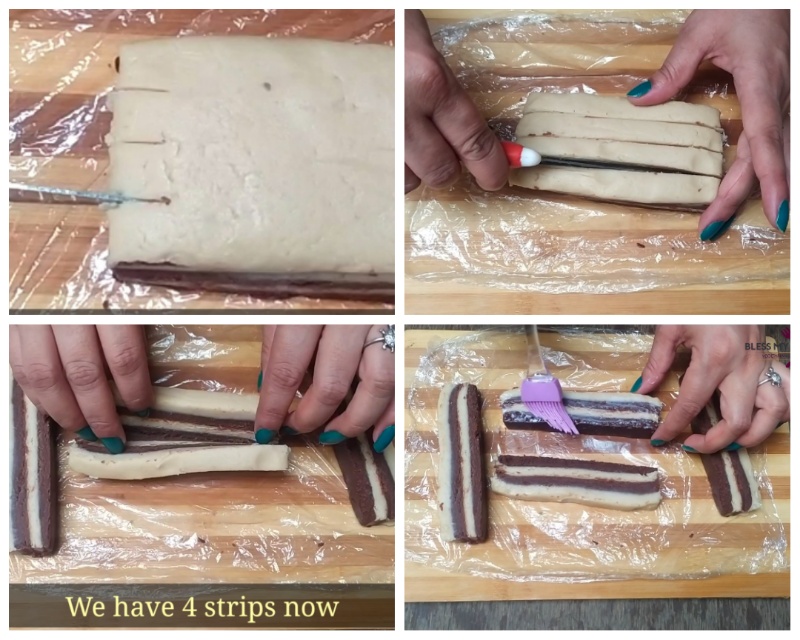
- Take up the another strip and place it on the milk washed strip in such a way that light layer should come in face with dark strip and vice versa.
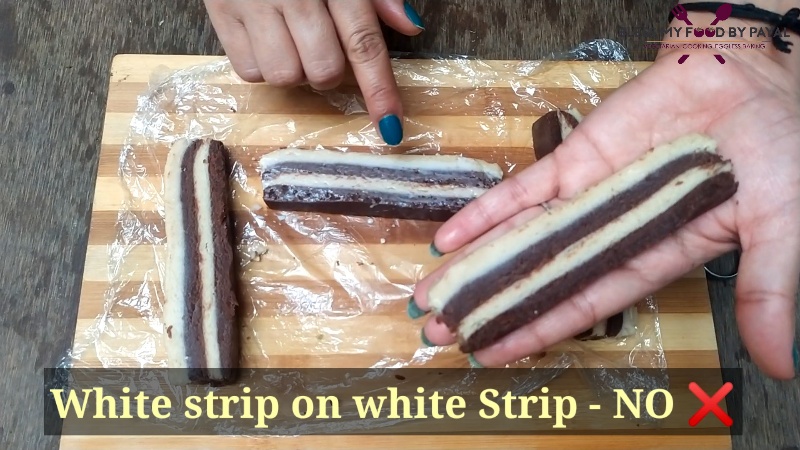
- See the picture below, White (vanilla) strip on White (vanilla) strip : NO.
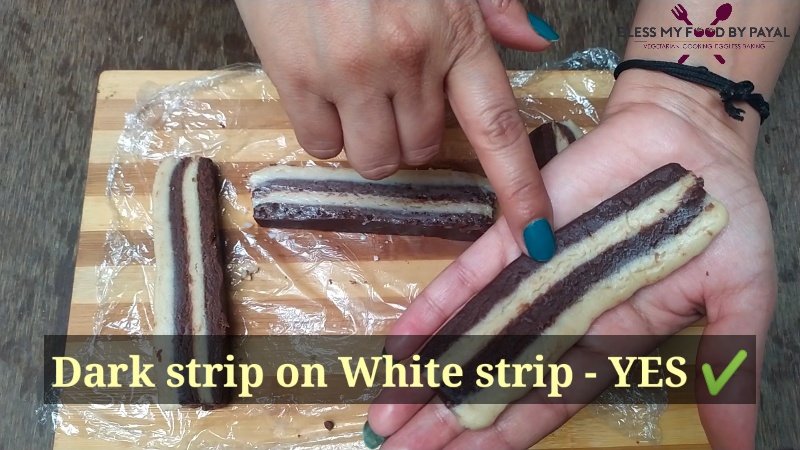
- See the picture below, dark (chocolate) strip on White (vanilla) strip : YES.
- Likewise place all 4 strips one on another after milk washing each layer but do note, there much be a match of alternate colours and this is very important otherwise cookies will not come good in terms of appearance.
- Again wrap them and place in refrigerator for last time for 30 minutes.
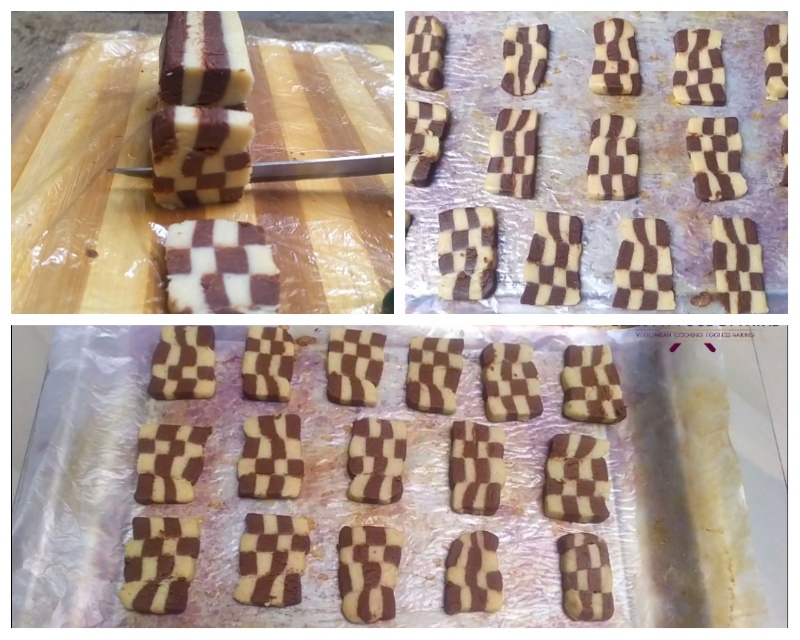
- Taking them out now, start cutting them into the rectangular size of cookies, as shown in picture.
- Arrange them on a baking tray lined with butter paper. Don’t keep them joining one another.
- Bake in a pre-heated oven @180℃ for 18 to 20 minutes.
- Let them turn cool completely.


Checkerboard cookies are ready. Enjoy.
NOTES
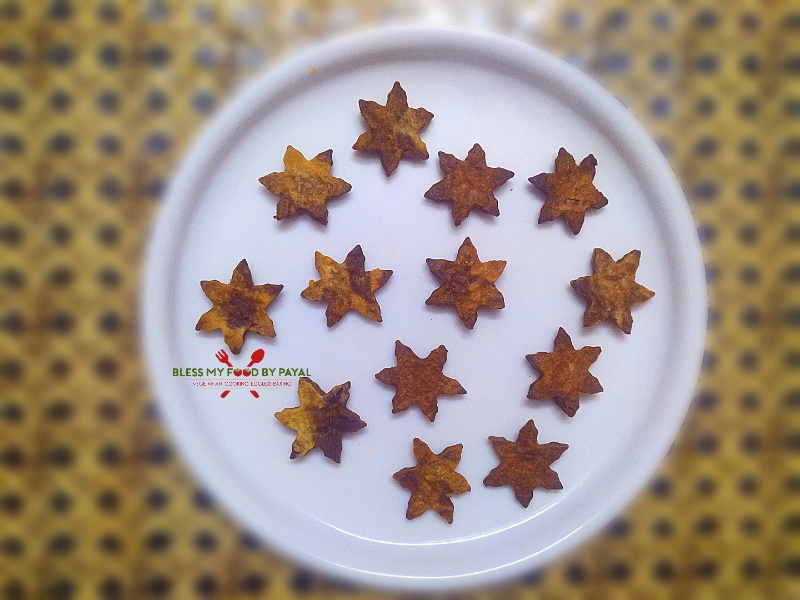
Those uneven sides of dough we were keep trimming were not supposed to go waste. Just rolled them and cut with a cookie cutter and baked. They too are the cookies, you can call them vanilla chocolate cookies.
Eggless checkerboard cookies recipe – recipe card
Eggless checkerboard cookies recipe | Chocolate Vanilla checkerboard Cookies recipe | Vanilla and chocolate cookies

Eggless checkerboard cookies recipe is a fun recipe made with vanilla and chocolate dough.
FOR VANILLA DOUGH
- 100 grams/1 stick/1/2 cup butter (unsalted)
- 3 tbsp sugar (powdered)
- 3/4 cup all purpose flour/maida
- 1/2 tsp vanilla essence
- Half pinch salt
FOR CHOCOLATE DOUGH
- 100 grams/1 stick/1/2 cup butter (unsalted)
- 3 tbsp sugar (powdered)
- 3/4 cup all purpose flour/maida
- 1/2 tsp chocolate essence
- 2 tbsp cocoa powder
- Half pinch salt
ADDITIONAL
- Milk as per need
MAKING OF VANILLA DOUGH
- Take butter, powdered sugar and vanilla essence in a bowl. Butter should be chilled and not melted or warm.
- Whisk it with the electric beater. You can whisk it with wire whisk also but that requires lots of time and powder.
- In 2 to 3 minutes, butter will become light and fluffy.
- Sieve all purpose flour and salt in it.
- Mix it and you will find a crumbled texture.
- Now assemble the mixture using your hand. Don’t knead the dough but only bring it together. If mixture is troubling you in coming together, add a bit of cold milk. Though we didn’t need to add milk at all.
- Wrap the vanilla dough in a cling film.
MAKING OF CHOCOLATE DOUGH
- The process of making chocolate dough is exactly similar to making of vanilla dough, except little changes in ingredients.
- Likewise whisk butter, sugar and essence together. We have added chocolate essence but if you don’t have it, use vanilla essence without hesitation.
- Sieve all purpose flour, salt and cocoa powder.
- Make a dough the way you made the vanilla flavoured above.
- Cling wrap this dough too and place both the doughs in refrigerator for about 30 minutes or till they become firm.
FURTHER PROCESS
- After 30 minutes, unwrap both the doughs.
- Roll them into a log and cut from the centre dividing into equal parts.
- Now you have 4 portions of dough. 2 vanilla and 2 chocolate.
- Take any one dough (let it be chocolate), and roll it with the help of rolling pin. Don’t roll it too thin. We didn’t find any hardship in rolling them direct on the wooden surface. But if you find trouble, you can do all your work on cling wrap or butter paper.
- Cut the uneven sides of dough with knife leaving behind a rectangular slab which is almost 2 inches in width and 6 inches in length. Keep it aside.
- Now take another dough but it should be of alternate colour. If earlier we took dark (chocolate) coloured, now we will take light (vanilla) one and roll it too like the previous one and cutting it’s odd sides.
- Brush milk on the earlier made slab (dark) and place the light slab on the dark one.
- Likewise make 4 layers of slabs in alternate colour one on another having milkwash in-between. Here we have chocolate > vanilla > chocolate > vanilla. To match perfectly, all slabs should be of equal size in length and width.
- Place them on a cling wrap and trim their uneven edges from all 4 sides.
- Put in refrigerator after wrapped in cling film for 30 minutes or until set.
- Take them out and unwrap.
- Facing any side either dark or light towards you, make 3 small marks at equal distance so that you get it easily from where to cut them.
- Now cut and divide them from the marks straightwardly. On dividing by giving 3 cuts, you will get 4 strips.
- Right now they are standing tall showing only 1 colour, but if you laid them onesided, there’s 4 layers of alternate colour in each strip.
- Milkwash the alternate coloured side of one strip.
- Take up the another strip and place it on the milk washed strip in such a way that light layer should come in face with dark strip and vice versa.
- Likewise place all 4 strips one on another after milk washing each layer but do note, there much be a match of alternate colours and this is very important otherwise cookies will not come good in terms of appearance.
- Again wrap them and place in refrigerator for last time for 30 minutes.
- Taking them out now, start cutting them into the rectangular size of cookies, as shown in picture.
- Arrange them on a baking tray lined with butter paper. Don’t keep them joining one another.
- Bake in a pre-heated oven @180℃ for 18 to 20 minutes.
- Let them turn cool completely. Checkerboard cookies are ready. Enjoy.
Those uneven sides of dough we were keep trimming were not supposed to go waste. Just rolled them and cut with a cookie cutter and baked. They too are the cookies, you can call them vanilla chocolate cookies.
PIN IT FOR LATER
Pingback: Chocolate vanilla Ombre cake | Chocolate Ombre Cake
Pingback: Eggless Walnut Cookies Recipe | Walnut Biscuit Recipe
Pingback: Whole wheat double chocolate chip cookies eggless
Pingback: Eggless atta biscuits with jaggery | whole wheat jaggery cookies | atta gud biscuits | atta jaggery cookies - Bless My Food By Payal
Pingback: Coconut cookies without eggs | crunchy coconut cookies | eggless coconut biscuits recipe - Bless My Food By Payal
These checker board cookies look so good. Recently, we made something similar. Lovely !
Thank you
These checkerboard cookies looks absolutely beautiful and appealing. Although its time consuming I think my little girl would enjoy the process of making it. Detailed explanation and process shots are so helpful for for beginners like me.
Truly, kiddos are going to love them. Thank you for writing in.
Wow!!! Such a detailed post and beautifully explained dear! I have always wanted to make these, but such a long procedure; not that patient 😀 Amazing looking cookies dear!
Yes they need much time but at the end of the day, they are worth it. Thank you
wow these checkerboard cookies look so delicious and you have perfectly baked 🙂
All the steps which you have shared are mush useful !
Thank you so much
Cookies looks really cute and beautiful texture, they came out really well. It’s on my todo list since long time, but it’s time consuming, so I always afraid to do it. Will think about it after seeing ur cookies. Thank you for your detailed video and written recipe.
Yes it’s time taking but worth giving a try. Thanks for writing in.
Wow, you have gone, extra mile to make these checkerboards cookies, very informative and detailed post. Looks so delicious!
Thank you so much
Cookies look beautiful and flavorful. I loved your description, and step by step pictorial details.
Thank you
Those checkerboard cookies came out really well. Love the beautiful texture and checker design.
Thank you
Checkerboard cookies look so pretty, you made it look like, making them is a breeze!! Very well explained and detailed post…Thanks for sharing!!
Thank you so much
Such pretty chequered cookies as they are also called. I use to make these often when my kids were young. I like how simple your method is. I use roll the doughs into ropes and layer them onto a flattened plain dough.
Thank you tons
Wonderful recipe. The cookies look so appealing. Your process shots are really helpful to understand every step.
Thank you much
One time consuming cookie but if you enjoy the process then it’s great.
Beautifully crafted.
Thank you
By the look Checker board cookies look so complicated but à you mentioned it’s fun making ans baking them.
Thank you for your detailed video and written recipe.
They are time taking but not as complicated as look to be. Thank you.
These step by step images and detailed recipe are so useful for all the bakers as it provides a visual guide what to expect at every step. Very often this is one I look forward especially in baking recipes. Thankyou
Thank you for the keen observation.